
In this 4th article on providing options to your own Wooden train set, I’ve prepared the options you can choose to build your Train Whistle, to set the start of your train on the Wooden train table that also is considered at the beginning of the article.
The common list of tasks that have most of the Wooden Train Whistle Tutorial is
- Select the wood and cut it
- drill a hole down the center of your piece of wood
- make a transverse cut to make the window and the lip reaching part of the initial hole
- make another cut in 30 to 45 degrees to reach the previous cut
- add a dowel into the hole
But here I present some options to choose despite the Tutorial you follow.
As this article is part of a series for articles that began with General alternatives to make a Wooden Train Set, and then options on how to make the Locomotive and Wagons, and later other options to consider when making tracks and layouts, before preparing our whistle let begin with another important part of our Wooden Train Set.
if you prefer to buy…
More Wooden Train Whistles Stuff

Ideas to make a Wooden Train Table or Board
One of the main uses of the table is to have the train ready to play, or for exposure.
When you want to play you do not have to be in front of the task of assembling and disassembling it. Also, you avoid that pieces get scattered around the floor and they get lost or get broken. Having the tables increases the durability of the train set. And when the table becomes an inevitable place in your home, it will undoubtedly become part of many memories.
Then you may think you need some sort of board to mount your train set on.
The parts of the table will be basically
- The top
- The box apron
- The legs
- The Stretcher
- High edges on the top.
- In the case of the edges, you must also decide what kind of joints you are going to make
.
- Drawers: you could add them to store elements related to the activity.
Then you will decide the dimensions of your train table: width, length, and height of the table as well as the height of the edges.
When you plan the dimensions, take into account, not only the length and width of the deployed railway layout but extra space to have elements of the train in the workshops.
It is also important that the distance to any point on the table is achievable from at least one of the sides..
Remember to make nice rounded edges for children.
The height must also be adequate so that you have comfortable access to manipulate the elements of the train both in the assembly and when playing in everyday use. We must also define the free space that will be around the railway or the edges.
It is appropriate to start with a drawing or plan, and in this case, one with the real dimensions, being able to check it before starting to cut and build.
Alternatives: Board, Table or Both.
When I talk about the table I am thinking of a flat surface where the entire layout of the railway is deployed. If you make a table, with its legs it will be destined for that exclusive purpose.
But you can also decide to make a board, that you can put over one or more pieces of furniture or eventually set it on the floor when you use it.
And even if you have a table designed for that purpose, you could also build the entire layout on an independent board to put over the table.
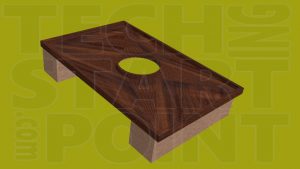
But you can also be creative when defining the shape of the table or the board. Instead of the traditional rectangular table, some choose to make a rigid board that can be over 2 low cabinets and even makes a hole in the middle of the board, allowing the child to interact with the elements of the train from the central space and from the edges feeling even more part of the environment. (In those cases it is suggested that you buy the Train Cap)
Then the child can access the trains from either side as from the central part of the structure
You also can paint the table/board using the dominant colors of your desired layout.
The legs
For the legs, you should think a structure that supports the weight of the train as any pressure that is made (both by the child or another type of human being)
The structure of the legs could be joined by an H stretcher to make it stronger.
Another alternative is to assemble each leg with 2 blocks of wood joined in an L shape. Despite the legs are L shaped or simple it is recommended to add a box apron.

Another alternative to using the traditional legs of any table could be making the legs with panels on two of the sides. If those panels peek over the top of the table, they could also serve as edges for those sides.
How to make a wooden Train whistle? : 2 Alternatives
We already have the locomotive, the wagons, the tracks, the layout, the table, everything in its place. (in our imagination)
We have everything ready for our train to begin its journey. But there is still something essential missing, without which the train should not start.
No … the train will not start until the guard blows his/her whistle and makes the announcement: “All aboard the woodworking train” to start playing.
And again, we have several alternatives to choose how to make it.
We can make a whistle with a single hole that produces one single tone, or a whistle with 4 holes of different sizes that generate four different tones at the same time.
Let’s start with the one-hole Wooden Train Whistle.

It will be basically a solid wood block longer than wide. It can be round or square. And on one of the ends, we must make a wide hole that goes through the center.
At a distance from that point similar to its width, we will make a traversal cut, to the center, reaching the hole we had made. This cut should be done at the edge, affecting 2 sides of the block. A little farther from the end where the hole is, we make another cut, at 30 – 45 degrees whose end coincides with the end of the previous cut.
Inside the hole, we must glue a reed, which will be initially a cylinder that fits exactly inside the hole but to which we will cut a section leaving one side flat. You should put the reed into the hole, pointing the flat side to the external side of the whistle. That’s where the air will pass.
And that is our whistle.
The 4 tones Wooden Train Whistle

If we decide to make the 4 tones Train Whistle, the same technique is used but using a wider wood block (almost twice wider). Instead of making a hole in the center of the end, we must make 4 holes, of different depths, and that goes through the cut that we will subsequently make.
Once we made the 4 holes, on the longest side and at a similar distance to the middle of the width, we will make a cross section up to ¼ of the width … in this case to the center of the hole that is on that side. Then we make the corresponding cut of 45%. And the same process is repeated for the other 3 holes.
We add the 4 reeds to the 4 holes as specified in the assembly with a single hole, with the free part so that the air passes out of the whistle. Then we should cut the excess of the reeds.
We can already test the whistle-blowing in each of the 4 holes.
Once we verify that each hole sounds good, we will add another element. With the same width as the whistle, we get a hollowed cube-shaped piece of wood … leaving only one side and the 4 adjacent sides (it remains as an open box)
On the main side, a hole is made. And the box sticks to the end of the whistle. That single hole will be where the air enters to reach the other four holes.
If we did cylindrically we would use wood turning to build it.
We could also do it with a hollow prism instead of starting with a piece of solid wood.
At this point, we can bend the arm in 90% and while we lower it 3 times shout out loud
“All Aboard the woodworking train”
Conclusion:
You have already taken the step -1.
You have already been able to assemble, disassemble, play, see yourself in the future, remember other trains with which you played with, think about the type of wood, the skills you already have, the skills you plan to learn, and many other things.
Now, get to work, … Or not … not yet …
This tutorial is missing one more ingredient, one more step, an essential step before starting … just one more.
You must not start today.
Keep intact your enthusiasm and at least once, maybe at least one night … go to sleep … and let all these ideas that you got in ofwoodworking … merge with your dreams. Then tomorrow with renewed desire, and with what your dreams added to this list, you can begin to build YOUR train, your own train, the one that is unique and that you will never forget.
You may also like…

Despite you are a novice, an expert or only anxious, here it is the selection of BOOKS with awesome woodworking projects to do in a short time

Consider which are the woodworking tools you want to get to build the workshop of your dreams.

You will appreciate the ingenious wooden characters toys, merchandise and the preferred quotes you can get for all Trekkies

You as a Chef or as a Woodworker have a deeply creative activity. When wood and kitchen come together creativity is enhanced. Find wood toys, furniture, accessories and much more.
This is the best video I found about making a Wooden Train Whistle