
You can see how easy to know How to replace the pool table Felt. Having disassembled the table pool as shown in the second article, now you can start replacing the felt of your slate. Pay attention to the tips to be successful in this challenging activity.
The main steps to replace a pool table FELT can be summarized as follow:
- Take off the Slate and the Rails
- Remove the felt from the slate and Rails
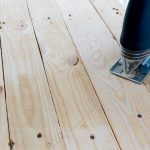
- Clean the Slate
- Attach the Pool Tablecloth to the slate
- attach the Felt to the Pocket Areas
- Reassembly the Pool Table
But you have to pay attention to the details of each of these steps since any imprecision could alter the normal development of the game. It is a job that must be done with care, patience, and knowledge.
Part 3/4 – The Pool Tablecloth and the Slate
In this series of articles, I present tips and step-by-step guides to be added to your creative experience for replacing your pool tablecloth, or at least to get some tips to do it.
If you have not read yet, it is good to read the introductory article. On which is explained How to Determine Which is the Best Pool Table Felt for you or “The Pool Table Felt Replacement Toolkit” as well as general advice involved in this activity.
The second article of the series explains How to disassemble the pool table.
In this article, you can find the details of replacing the Pool Tablecloth on the slate.
Later I will continue with The relation between the felt and the rails.
But now I putting the felt in the slate. Let’s go.
Put the new Pool Tablecloth on the Slate.
Double-check the size of your pool tablecloth is enough to cover the slate having extra length for all sides. Also, ensure you’ll have enough cloth for the rails. In case you need to cover also the slate thick in the pockets, keep aside the felt lines for that task.
Double-check again your slate and the pool tablecloth are clean. Prepare your slate by brushing it off. Ensure your cloth is actually clean and free of any undesired particle. You can do that swapping your cloth back and forth that just make sure there’s no trash left on the felt nor on the table. Shake your cloth off, look at the backside of it, make sure you have no strings or threads or any foreign material on the backside of the felt.
Its time to put the felt into the slate
Which side of the pool table felt is up?
Determine which is the upside by looking for a sticker or a logo or other label that tells you which side is face up. If it is unlabeled, don’t guess. Consult the manufacturer to know which is the playing surface.
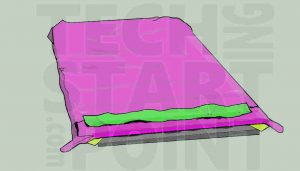
Then, lay the felt out face up over the table. Hang extra felt over the foot end and the head end and sides.
Get the cloth damp so it stretches easier.
For thicker slates: Put the cloth in pocket borders.
If the slate thick is one-inch or thicker you may prefer adding some felt pieces to the pocket areas in order to fully cover the border surface. Cut off a strip of felt to cover the vertical, circular surface in the pocket areas.
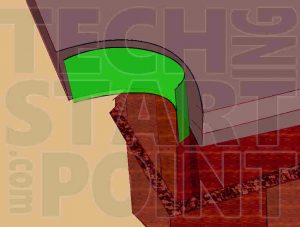
Pool Tablecloth strips in pocket Area: If the slate thick is one-inch or thicker you may prefer adding some felt strips to the pocket areas in order to fully cover the border surface.As you’ve read in the previous section you already have cut some pocket liners for use here.
They serve two purposes.
- First, it will be an extra piece of cloth on that border, so, when the ball hits the pocket, and bounce back, hit that slate that’ll be the easiest place for the cloth to tear. Then this will give a little extra protection there.
- Second, when you put the cloth on each pocket, when you fold the pocket down, as it is a quarter or half circle, it could let some uncovered wood there. Then this piece of felt will ensure not to see any of the exposed slate in the pocket.
Cut off the felt strip into smaller pieces to fit the vertical, circular surface of the corner and side pockets.
First, you spray on the pocket border adhesive using a piece of cardboard to avoid to get any glue on the table, on the rest of the felt or on the floor. It doesn’t take a lot of glue to hold these felt pieces in. Then put your pocket liners in. The pocket liner needs to be below the edge of the pocket, in order to not interfere with the path of the ball when it is rolling. Be sure not to have that pocket liner up above your pocket. Double-check it also when pulling the main felt piece. Later, when it’s your time to do the pockets you’ll have enough cloth there to do it. Make this process one pocket at a time.
Put the Felt on the Table
As there are many ways to extend the cloth on the table, and several table models and manufacturers, it is important to have clear the goals you want to achieve and the mistakes you want to avoid.
Stretching the cloth in the wrong direction can make your final playing surface unpredictable or irregular. The least little thing will seem like a boulder under it once you get this cloth stretched and on the slate To have the assistance of a friend (who are happy you having the pool table) and working carefully and slowly, focusing on details, will minimize the chance of any mistake when stretching the cloth as you fasten it. The most important part here is to get the cloth tight. You need stretch at least tightly enough to remove all wrinkles. Also, the tighter stretched surface will allow for greater speed. What is also important is that the felt has to be uniformly tightened in all the table surface.
You can run your hand across the felt on each step to check the surface is smooth when installing it. The felt needs to be tight, without wrinkles, without irregularities, horizontal and flat.
The following steps for putting the cloth on the table are divided into Staples and Glue alternatives, depending on your slate type. You can choose the same alternative that was used to attach the old felt. Generally, for staples, there is a wooden or particle board backing on your table. In those cases, you can additionally use glue. It there is no place for staples, felt will be attached using only glue.
During this step, in either case, lay the cloth over the tabletop, smoothing it as you go. Pulling the pool tablecloth to get tight might imply pull once, wait a while and pull again.
Staples Option: Put the Cloth on the Table
In this case use a staple gun, a hammer tacker or manual stapler to attach the felt using staples.
There is a lot of different ways to put the cloth on the table. One strategy that many woodworkers use is the following:
Staple it on each end, and then go back and pull it to the center pocket and add staples close each pocket first. Then add additional staples to complete each side. On each case put one or several staples to hold it as you pull it.
Then, begin putting the initial staple in one of the shorter edges close to one of the corner pockets. The second staple should be in the opposite side near the opposite pocket (The other shorter edge). The important thing when doing that is to get the felt tight.
The third and fourth staple should be close to the center pocket of one of the longer edges. Before putting these staples be sure to strength the cloth in a way you have slack in the pocket. You will give you extra material to work with when lining the pockets. Also, make sure your center mark lines up.
For doing that you need to strength the cloth from one corner to the middle pocket, and then put one staple on that side. Later you need to strength from the other corner to the middle pocket and staple the other side. Pay attention to not let any wrinkle in the cloth.
Repeat this process for the other side.
Stretch the felt across the first edge and staple it in several places. Staple about every enough distance to not let wrinkles arise along the edge, from one corner to the other. One rule of thumb to determine the distance between staples is to check initially how many staples or distance had been used for the old felt.
Then complete the needed staples for one of the long edges. On the selected long edge pull the felt taut, and staple at the defined increments.
Later staple the other two edges in the same way. If the preceding staples make it difficult to create a flat surface, you may need to remove a few staples and try again.
How to cut felt to pool table pockets
Corner Pockets
Trim the material at the pockets and staple it inside.
Make five slits in the felt directly over each pocket shaping four triangles on the felt.
Take a look at the pocket. Put it tight. Then make the first cut in the middle of the pocket using a box cutter. Put the box cutter in the upper side and cut it down, right in the middle.
The next two cuts should go over halfway between the first cut and each end or the pocket.
And then cut again. The last two cuts from each upper end of the pockets.
After the five cuts, you will have four felt triangles on that corner.
Fold the felt triangles down into the pocket and staple it inside the pocket. Pull tight the felt before adding staples. In all cases, the felt need to be tight.
Middle Pockets
Cut the four triangles like in the corner pockets. The process is almost the same. You should strength a bit tighter the middle pockets as they generally are a little bit more difficult to stretch. There is also much room in there as the shape is half of a circle instead of a quarter. It is better to pull any one of the triangles down tight instead of pulling them in pairs like in corner pockets. But all the other steps are the same as corner pockets.
Remove or Fold Cloth excess
Use a pair of scissors, razor blade or box cutter to snip off the extra material.
Glue Option: Put the Cloth on the Table
Install the cloth by using contact adhesive spray applied to the top and edges of the slate, near the sides. Some woodworkers also apply glue and attach the cloth to the bottom side.
It’s better to use a specialized adhesive to glue the felt to the slate. One popular option is the Super 77 Multipurpose Adhesive. Cover previously any area or region you want to protect from a spilled spray. Remove those protections just before you lower the glued cloth. While applying the spray glue use a piece of cardboard to avoid shut glue on the floor.
It is better to do one side at a time. The glue dries very quick. Once you start is better to finish it. Always pull the cloth smooth as you go. After attaching each part of the felt, think that while the glue is fresh, the fabric can be adjusted/moved a few times until it is in the final place. But it’s convenient to be careful and set it right the first time.
The head
We can begin with one of the shorter sides, e.g. the Head.
On the head, fold the head end of the cloth up, exposing the slate border where spray glue will be applied. Then about one inch and a half of your slate edge will be discovered.
Set pieces of cardboard over the corners, in 45 degrees, to avoid glue reaching pocket areas.
As the glue spreads, be careful not to spray over the felt. Use a scrap of cloth or any other element to cover the upper part of the cloth that could be exposed to the glue spray. You don’t want any glue on top of the felt.
On the head, fold the head end of the cloth up, exposing the slate border where spray glue will be applied. Then about one inch and a half of your slate edge will be discovered.
Spray that portion fo the cloth underside with the glue, and the edge where the felt is going to be attached as well. Apply the glue on the upper surface and all the thickness of that edge. Some woodworkers also use to spray the underneath border of the slate. In such a case, you should fold the felt and “also” stick it below instead of cutting the excess.
Wait a few minutes, probably five. To be sure, check the adhesive manufacturer’s instructions.
You can check it is tacky but not wet anymore and then, remove the corner cardboards, remove the cloth protection, and pull the cloth down. Wrap it around the edge and anchor it in the adhesive. Carefully attach the felt to the table. Start sticking the cloth at one end, close to the corner. Then pull from the other corner of the same edge, until the felt is really tight on that side and stick the cloth on all the length of that edge, pressing down first with the hand. Later, press down with a roller, being sure there are no wrinkles on that edge.
Press the cloth with the roller also to the border of the slate.
The footer.
Once you stuck the cloth on the head, apply the glue in the same way on the footer edge. Then begin folding down the middle first. Start pulling the cloth tight and stick the middle. Also, make sure your center mark lines up.

apply the glue in the same way on the footer edge. Then begin folding down the middle first. Start pulling the cloth tight and stick the middle. Also, make sure your center mark lines up.
Glue the footer Pool Tablecloth
apply the glue in the same way on the footer edge. Then begin folding down the middle first. Start pulling the cloth tight and stick the middle. Also, make sure your center mark lines up. To pull the corners side you should need to apply diagonally the force. To achieve this goal, pull first in the longer side direction and when is enough tight, pull in the wider side direction, and stick the cloth when there are no wrinkles anymore on that side. Repeat the process for the other corner. Use the roller to keep the cloth firm once you confirm the cloth is on its place.
Make sure there are no wrinkles on the felt and you are pulling with the same force on every side.
Long sides
Repeat the process for the long sides. On them, you should use 4 pieces of cardboard in 45 degrees to protect the corners and the middle pocket area. Begin stretching the cloth on the middle and one of the corners and finish in the other corner. And lastly, to finish sticking the felt, repeat the spray glue process with the last side. In all cases pass the roller in the upper surface and on the border of each edge. Make sure it’s stuck all around. Put more glue on spry again in the areas where it is necessary.
How to cut Felt to Pool Table Pockets
Corner Pockets
Make five slits in the felt directly over each pocket shaping 4 triangles on the felt.
Take a look at the pocket. Put it tight. Then make the first cut in the middle of the pocket using a box cutter. Put the box cutter in the upper side and cut it down, right in the middle.
The next 2 cuts should go over halfway between the first cut and each end or the pocket.
And then cut again. The last 2 cuts from each upper end of the pockets.
After the five cuts, you will have 4 felt triangles on that corner.

How to cut Felt to Pool Table PocketsIf the slate is thicker than 1 inch you should have added previously the extra felt on the border as mentioned earlier to not be seen any wood between those felt triangles.
Now you have to glue the corner underneath and spray back the slate and the cloth triangles. Be careful to not let glue on the top of the table. And then pull the triangles tight and glue them under the table. Press the slate border and under the table. You can also use duct tape across those stuck triangles. Put it closest to the edge of the pocket as possible to really keep them firm.
Middle Pockets
Cut the four triangles like in the corner pockets. The process is almost the same. You should strength a bit tighter the middle pockets as they generally are a little bit more difficult to stretch. There is also much room in there as the shape is half of a circle instead of a quarter. It is better to pull any one of the triangles down tight instead of pulling them in pairs like in corner pockets. But all the other steps are the same as corner pockets.
Especially here it is important to add the duck tape as close as you can to the edge, and then press with the roller.
Remove or Fold Cloth excess
With a box cutter, you can remove any cloth excess of the edges under the lower border of the slate all around, as the lower part will be laid on the pool table case and the borders have been already stuck.
Some woodworkers prefer to fold and stick underneath the extra felt in the borders. For doing that you need to have enough felt to wrap under it and tight it.
The next and last article will cover the final steps, especially about “Pool table rails and felt”
One of the videos I most like about pool table felt is
You may also like…
Review which helps do you have to the wood cutting activity including power, safety, and handtools.

The magazine that mainly helps on home improvements also presents woodworking projects in a DIY approach on their pages and on their books.

If you like collectibles and enjoy to have at your hands the sword SAO replicas, you will enjoy the woodworking view of Sword Art Online.
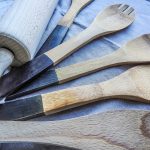
You as a Chef or as a Woodworker have a deeply creative activity. When wood and kitchen come together creativity is enhanced. Find wood toys, furniture, accessories and much more.