

You can realize it’s not so difficult to know How to Refelt Pool Table Rails. Pool Table Rails and Felt is one of the most interesting topics about taking care of your Pool Table. You can check free these simple tips and advice to take care when replacing the pool tablecloth on your rails. Your patience and focus on detail can make you join this rewarding activity.
The Main Steps to refelt Pool Table Rails can be summarized as follow:
- Disassemble the Rails
- Identify the type of rails you have.
Both most common are :- Feather Strip
- Timber Block
- Remove the feather strip or the Timber Block
- Remove the old Felt (Attached using staples)
- Attach on side of the felt according to the type of rail
- Wrap the felt around the Cushion
- Staple the other side of the Felt and the Ends
- Reassembly the Rail
But you have to pay attention to the details of each of these steps since any impression could alter the normal development of the game. It is a job that must be done with care, patience, and knowledge.
In this series of articles, I present some step-by-step guides to be added to your creative experience for replacing your pool tablecloth, or at least to get some tips to do it.
This is the last article of the series, and it focuses on refelting the Pool Table Rails.
It is out of the scope of this article how to disassemble the rails as that topic was covered in a previous article: Disassembling the Table Pool and Criteria to buy the felt.
Other articles of the series are
- How to replace Pool Table Felt? Introduction
That cover General topics like- The Table Pool involved parts when replacing the Felt
- Tools and Supplies for the Felt Replacement
- How To replace the felt on the slate
Replacing the Tablecloth For each Cushion
Do the following steps for each rail or cushion. Doing one cushion at a time avoid making mistakes disassembling and assembling them.
How to replace the Felt on Pool Table Rails
There are also several mechanisms to keep the felt tight depending on the parts that make up each rail. The two most popular ways pool tablecloth is attached to the rails are:
- a feather strip
- a timber block with screws
I’ve already explained each of them in the first article of this series. In the next step by step sections, In these articles, when the steps apply to only one type of rail, I mention it explicitly on the subtitle itself (feather strip/timber block ).
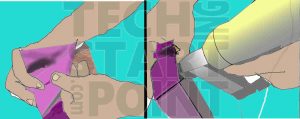
Remove the Old Felt from Rails.
To remove the old felt start very carefully first, remove the staples with a staple puller or a flathead screwdriver. Put the end of the staple puller underneath the staple and pull it loose. Just put one end and twist. Then after one end of them are loose, using a Needle Nose Pliers pull your staples out.
Be careful to not put the old staples in your work area, in a place where could damage the new felt.
If the old cloth does not come off right away, cut the old felt along the top of the rail.
Feather Strip: Remove the Old Felt from the Rails.
If there is a feather strip, the felt is pressed by the feather strip set to the rail using a rubber mallet.
Each cushion has a thin wooden “feather strip” running beside it, which is typically attached only by pressure on it. In some rare cases, it could be attached using adhesive, nails or staples.
In most cases, it is enough to pull out the felt. As generally, it is really tight, just lift very slight. Be very careful you don’t break the feather strip in half. You can pull the felt out in diverse parts of the length again until the felt comes out easily.
Before pulling the feather strip out make a mark in the middle of the rail and the feather strip in order to put it later in the same position. You should make sure your mark is actually visible. Then pull the feather strip out. You do this so you’ll know where the center of the rail is as you’re putting your fabric under the feather strip.
Then pull the feather strip out. If it won’t come up easily, Use a thin flathead screwdriver to pull it up without destroying it.
Feather Strip: Place the new felt over each Rail.
Before laying the felt you can check the gap between the feather strip and the groove to check how tight it is. Generally, it is correct. But if you notice there is too much light on all the length probably you should replace the feather strip. In the case, only on some sections you get a much wider groove and the gap is too much, you can fix that back adding a couple of staples on that sections at the end of this step. (But next time you should change the feather strip)
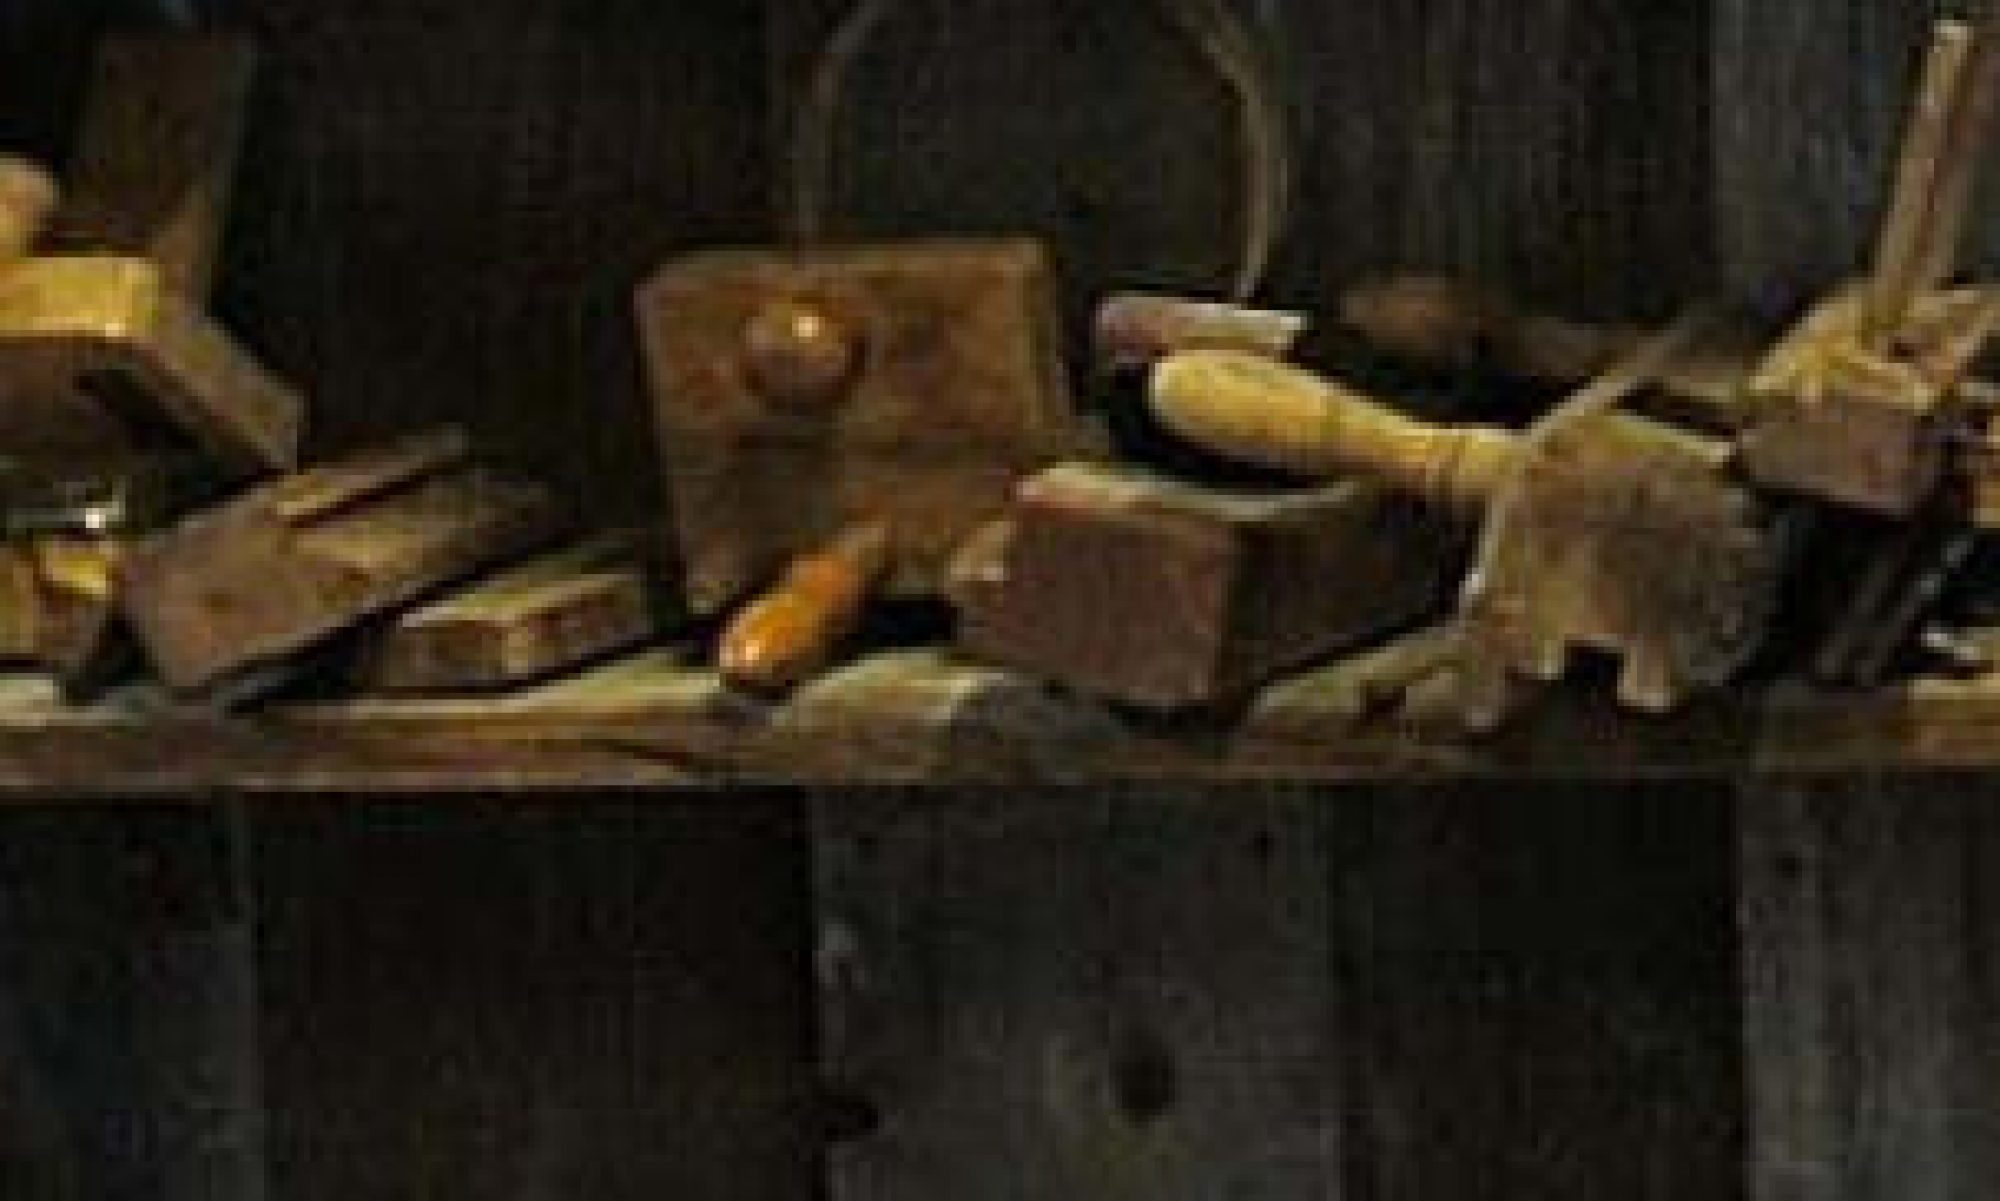
Lay your felt across the rail. Unlike the table surface, put the felt stickers face down. Keep an overhang enough to wrap all the rail starting on the feather strip groove.
Lay the feather strip in position, according to the little mark, over the felt, over the rail channel. Make sure the center and end of the railing are in the right position.
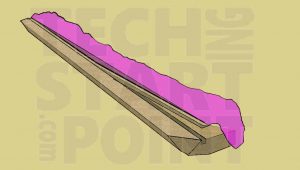
Use a rubber mallet to hit in the middle of the feather strip, to give it a good firm lick to get it in the groove pressing the felt. Push the feather strip down while you gently tap it using the hammer. You don’t need to be hit hard. Follow these steps taking care not to break the feather strip. Take special care to not strike the feather strip directly, to avoid denting the table. Some woodworkers cover their rubber hammer with a soft material.
Lay the cushion on a firm place to ensure not to fall while hitting the feather strip.
And you begin to line the center of it up. Hold that feather strip down so it’s not flopping around. And pound from the center to the end to attach the felt under it. Use the thumb to guide the direction and position of the felt while hitting the feather strip.
Give the felt a tug on all its length to ensure it is tight. Exceptionally add a couple of staples right in the middle of the feather strip to fix loose strip if you have detected there was too much gap on any section.
Trim the excess of cloth all the length, pressing down the box cutter to avoid inadvertently damaging the felt that you should wrap around the rail. Go slow. And trim triangles at the end of the corner pockets to make it easier to tuck that behind the end strap.
Then wrap the pool tablecloth over the feather strip and pound again all the way over the pool tablecloth to get your feather strip down flush. Not to simply beat all pieces.
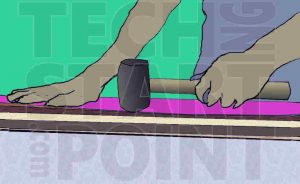
Wrap the felt around the rail and pull it to allow staple it on the bottom side. Prepare your staple gun to do a lot of work. Start by stapling from the corner pocket side. At that point take the cloth on the corner pocket split it about a 45-degree angle out from the corner and put your first staple in.
Then pulling the felt from the corner to the centre of the rail, continue to pull out wrinkles using your thumb and stapling the cloth on the rail. The felt needs to be tight but not tight enough as to distort the rubber on the rail, that’s where the balls should bounce.
Fold the felt on the side pocket, pull it tight and finish putting a couple of staples close to the side pockets and close enough to the backing pad.
Finish trimming all the excess of cloth.
Alternatives when stapling the felt on the rail.
Some woodworkers prefer to start stapling from the center. You may find your way. Putting staples sideway on the bottom on the corners allow to set them closer to each other.
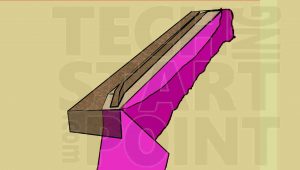
At the end of the rail, instead of only pulling the felt and stapling you could fold the felt twice. First time fold the felt back and then fold it over generating a tight line at the end and adding two staples on each side (See figure)
Some rails have a special notch made for stapling. The staples go in the middle, between the notch and the end of the edge.
For championship cloth, your thumb is pulling near the place to put the staple, perpendicular to the edge of the rail. For Simonis cloth installation and speed cloth, you should staple a couple inches away of you thumb pulling diagonally (main force in the same direction of the rail length) You notice the way you chose is right if you don’t see any wrinkle.
Timber Block: Remove the Old pool tablecloth from the Rails.
At first, you need to detach the timber block generally removing the screws that hold it in the rail, using a screwdriver. You should also remove the staples that attach the felt to the timber block.
Timber Block: Place the new felt over each Rail
Lay the timber block in a place to work on it. The side that needs to be up is the one which normally is in contact with the rail.
Then, put the felt already cut in the position straight on the timber block and put a couple of staples on each end of the timber block to attach the felt to it.
Then put staples on all the timber block length on the side that should be in contact with the rail.
Place the timber block back on the rail, and put the screws to hold it.
Wrap the felt around the rail and the timber block and attach the felt to the timber block stapling all the length of it.
Timber Block: The end of the cushions.
Stretch the felt around the corners, taking care not to cover any hole. Staple the felt underneath. And fold the cloth in the flat area adding staples to avoid wrinkles. Add staples around the corner and trim the felt excess
Set up Pool Table
Now it is time to review how to assemble the pool table
Now it is time to rebuild the pool table. Put the focus on the following tips now that we are near the final goal.
Put the slate in the case.
Surely you will not want to read this part. You know how to do it. It is the inverse procedure of the first steps. But only three advice on this step.
Think about getting a friend help doing this. Be careful not to hurt your fingers.
You may wish to use a level to test whether your pool table is flat and horizontal. If it is not, use a small pry bar to lift the lowest leg and add a wooden or metal shim. In several pool tables, there are leg levelers.
Reassemble the rails.
Finish preparing your rails away from the table. In some cases, you need to attach the pockets to them.
Once all your rails are complete, bolt the rails to the table and cover them as they before began. Put your pockets on. Avoid gaps between the rails and the pocket. Make then firm but don’t put too much torque on it. Put all bolts and adjust them progressively.
Pay attention to the center pockets are in the middle of the table. Be sure your pockets line up with your rails. Be careful when moving them not to fall or to hit anything. Work with enough space. Lay the rails on the table taking care not to damage the new felt. Be sure your rails are aligned. After checking all the details, finish tightening the bolts.
Conclusion
Congrats!!! You have re-clothed your table pool.
I hope you enjoyed this instructable as much as I enjoy. Thanks for reading and continue to enjoy ofwoodworking.com
You may also like…
What do you prefer to buy? Review portable and fixed alternatives for the Woodworking Bench, the place where most of your work will happen.
Enjoy looking a selected set of wooden watches, and review what most appeal to people like you that love this distinguished style.

If you like collectibles and enjoy to have at your hands the sword SAO replicas, you will enjoy the woodworking view of Sword Art Online.
You as a Chef or as a Woodworker have a deeply creative activity. When wood and kitchen come together creativity is enhanced. Find wood toys, furniture, accessories and much more.
I also share with you one of the videos I most liked about felting pool table rails
And this one shows about the timber block approach